Raspberry Pi SQS Setup (Depreciated)
Raspberry Pi Image Processing
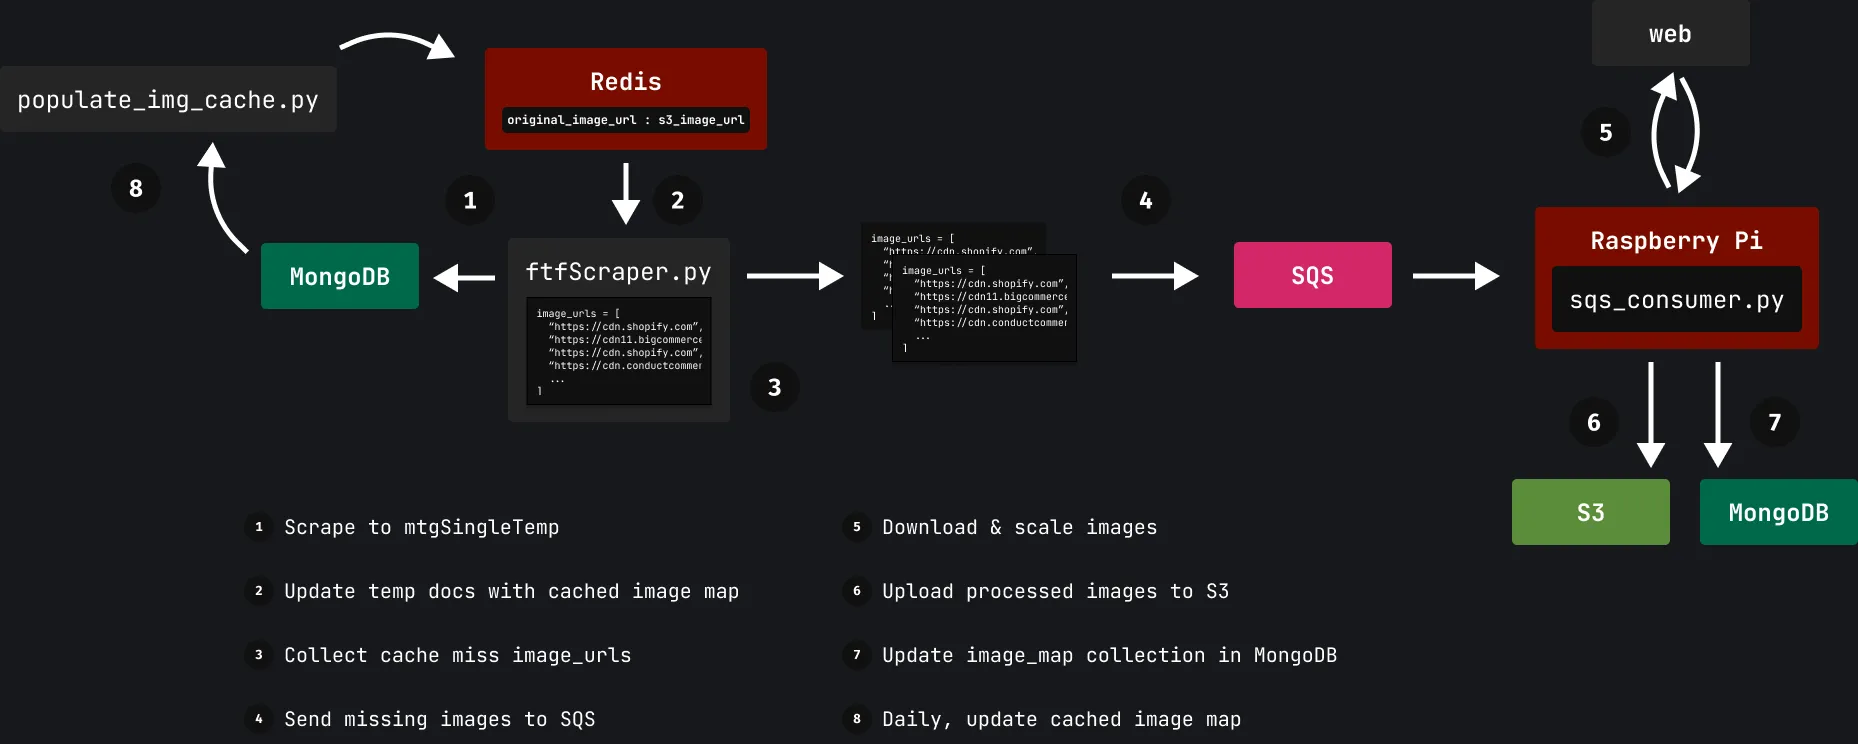
This guides through deploying sqs_consumer.py on a Raspberry Pi. The SQS queue contains batches of image urls. The consumer is meant to:
-
Pull batch of image urls from SQS
-
Fetch and download the image
-
Resize the image, and convert to jpeg
-
Upload image to S3 bucket
-
Update image map in MongoDB
The script currently is set to run forever, and restart in the event of an error. Another option, would be to remove the call to safe_main() in sqs_consumer.py and setup a cron task to run the script on a schedule.G
Deploying
This will explain how to configure AWS and necessary dependencies on the Pi.
1. Requirements
First, install dependencies on the Pi
cd snapcaster-backend/scripts/image_cdn/process_img_handler/pipip3 install -r requirements.txtOR
pip3 install boto3 pillow pymongo requests2. Setup consumer service
First we need the environment variables. I have setup snapcaster-iam-user in AWS that has S3, SQS and SES permissions.
Since we are setting this up as a systemd service, the environment variables must go in the service file.
There are two files we need to create:
sqs_consumer.servicesqs_consumer_env
In this directory, there are templates for each file.
2.1 Create systemd service
-
First, copy the
sqs_consumer.servicetemplate file to/etc/systemd/system/sqs_consumer.serviceTerminal window sudo cp sqs_consumer.service /etc/systemd/system/ -
Next, we will do the same for the
sqs_consumer_envfile, which goes to/etc/Terminal window sudo cp sqs_consumer_env /etc/ -
Now we need to adjust the files for your environment.
Terminal window # edit service makefilesudo vim /etc/systemd/system/sqs_consumer.servicesqs_consumer.service # Adjust the file for your environment# Here, the user is hydrogen, and the snapcaster repo is in the `/home` directory.[Unit]Description=SQS Consumer Service[Service]# Change userUser=hydrogen# Change working directory where sqs_consumer.py is locatedWorkingDirectory=/home/hydrogen/snapcaster-backend/scripts/image_cdn/process_img_handler/pi# Path to python and sqs_consumer.pyExecStart=/usr/bin/python3 /home/hydrogen/snapcaster-backend/scripts/image_cdn/process_img_handler/pi/sqs_consumer.pyStandardOutput=inheritStandardError=inheritRestart=alwaysEnvironmentFile=/etc/sqs_consumer_env[Install]WantedBy=multi-user.target -
Now we have the service setup, we can configure the
sqs_consumer_envfile.Terminal window vim /etc/sqs_consumer_envsqs_consumer_env AWS_ACCESS_KEY_ID=your_access_key_idAWS_SECRET_ACCESS_KEY=your_secret_access_keyAWS_DEFAULT_REGION=ca-central-1MONGO_URI=your_mongo_uri
3. Running the service
Now we can run the service:
# Enable and start servicesudo systemctl enable sqs_consumer.servicesudo systemctl start sqs_consumer.serviceIf you want to enable on boot, run:
# restart service and enable on bootsudo systemctl daemon-reloadsudo systemctl restart sqs_consumer.servicesudo systemctl enable sqs_consumer.serviceCheck the status to verify it is running:
# check status of the servicesudo systemctl status sqs_consumer.serviceNow you can use journalctl to view logs from the new service. Ensure there are no errors.
# check logs produced by service (oldest first)journalctl -u sqs_consumer.service
# check logs produced by service (most recent first) (limit 20)journalctl -u sqs_consumer.service -r -n 20
# check recent logs since yesterdayjournalctl -u sqs_consumer.service --since yesterday -r
# follow along most recent logs in real-timejournalctl -u sqs_consumer.service -f